Tuesday, December 6, 2016

EGGS OF BLUE!

Nothing beats your very own home grown fresh eggs. Except your very own BLUE and GREEN eggs! 
Our new developing Easter Egger flock is largely made up of pure Ameraucana hens and roosters, meaning many of the chicks will be pure bred Ameraucana.


Three of our roosters are part of a project to add amazing flowered feathers to the blue egg world, so some of the babies may have these roos as their dad. These amazing roosters have such amazing, deep, iridescent colors that just sparkle and shine in the sunlight!


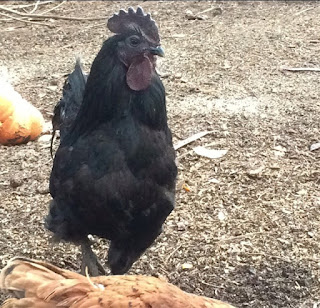
We also have a pure Ayam Cemani rooster! The babies from eggs from these boys will lay blue, mint, light olive, or maybe gray, depending on how much of a dose of pinkish tan egg gene they get from dads.

 Babies from the cemani boy will lay blue eggs like their mothers, since cemani boys carry only white egg gene, however, these babies will be black to the bone like their father! 


ALL the babies from our blue eggs will have the blue egg gene as they are ALL from our pure Ameraucana hens. 


If you like, we do also have eggs from our buckeye and RIR girls if you want to add a few of those for a great Easter egger mix. Many of these eggs will have Ameraucanas as their dads, so odds are about 50/50 that babies hatched from these eggs will still lay various shades of green/blue eggs as adults from the blue gene carried by their dad. The other half will lay varying shades of pinkish/tan. 


 Eggs are $25 a dozen. All blue eggs, $35 a dozen.
We are located in the Chattaroy/ Deer Park area, but we can deliver to downtown Spokane on Mondays or occasionally by appointment depending on when we will be in town. 
Send me a message if interested!

Sunday, November 6, 2016

Hatching Cracked Eggs


Oh no! I just cracked this beautiful blue egg as I was on my way to put it in the incubator! Argh! 😫
But check this out:

Many cracked eggs can still be successfully hatched with a bit of Scotch tape! You have to be able to cover every hairline crack, but not cover more than 30% of the egg so the shell can still breathe. You can candle the egg to check for hairlines. The light makes them stand out nicely. 

21 days later: 
Look closely and you can see it's hatching! 


A healthy baby chick! Despite a rough start! Yay! 😃

Friday, September 16, 2016

Chamomile Harvest

I spent a lovely quiet late afternoon picking chamomile flowers in the garden. Not many flowering plants can match the enthusiasm of chamomile.
Hundreds of tiny daisy-like blossoms cover a typical happy mature plant. Just looking at it brings joy and a sense of peace and tranquility. While I was picking, there must have been five hundred little bugs representing a dozen species. Paper wasps and honey bees mostly, but also flies, bumblebees, and a few beetles.  


Chamomile is a calming herb. It calms the nerves, calms the tummy, calms the mind. Maybe it could be called "calm-o-meal"! Making a tea and sipping before bed is a great remedy for insomnia. It combines well with lavender for a really powerful sedative punch. 


After picking until I just didn't want to pick anymore (I could have kept picking for a couple more hours, and still not have picked them all!) I took my bucket of flowers inside and spread them on a roasting pan to dry. I put the pan in a warm oven, (about 100 degrees) and will stir the flowers around a bit as they dry. After drying, they will go in a quart jar with a tight lid for use all winter long, until next year, when they will be blooming all over the garden again!


Another use for this happy bright flower is for beauty and body care. As a hair rinse, it gently conditions as well as lightens the color of your hair. Simply use a tea to rinse and leave on to air dry.  As a skin cleanser and tonic, chamomile will sooth irritated skin, tighten wrinkles, and relieve puffy eyes.


Wednesday, April 20, 2016

Cotton Patch Geese Pair For Sale


Spokane, Washington. Asking price, $100. Will consider some trades, interested in Black Shouldered Peacocks, Olandsk dwarf, and production blue-egg chickens. 


It is with deep sadness and regret that I must admit I need to sell our pair of cotton patch geese. They deserve better than what we are able to offer them at this time. For one, they need a larger family. We have only the two of them, and they spend their days seeking the company of others, either looking in the front door for us, or pacing the fence to try to socialize with the chickens across the way. They also deserve more water than their kiddie pool. When we moved, it was our intention to find a place with a pond, but it didn't work out that way. We got a river instead! I'm not complaining, but obviously that's not going to work out so well! I'd love to see our geese go to someone who has a pond for them to frolic in! 


So here's their stats:
Both are Walker line that I bought from Regina Hembree Breland in Mississippi. Amanda is almost 2, and Logan is just turning 1 year old. Amanda hit the nest early this year and laid 3 clutches of 7-8 eggs for a total of 24 eggs! Unfortunately, they were all infertile as Logan was maybe just a little too young to know what to do. However, Amanda looks like she might nest again soon? 


I need to sell them locally, as I have no desire to make them deal with the danger and stress of shipping. I might consider Delta Dash if someone wants to go that route. 


These are wonderful pets as their personality is simply charming! They will follow you all around the yard, always sharing a close look at whatever you are doing. They are sweet and gentle. Amanda loves to be petted and cuddled when she is in the mood. 


If you are interested in these beauties, please contact me! You can send me a gmail at delilahra. Thank you!


Friday, March 4, 2016

Modifying a Tray for Quail Eggs

So I have decided to get back into coturnix quail. We got a bunch of eggs from a local guy with a great line of jumbo coturnix. Our "universal" egg trays would not accommodate the huge-but-still-smaller-than-a-chicken eggs, so I sat and thought for a while about how to make the trays work somehow while we wait on our new partridge egg trays to come in the mail. I tried running a string across the bottom, which kept the egg from falling through, but there was no way to place a string higher to stop the egg from flopping all around when the tray tilts. So I was kinda stumped. Then it hit me. The answer was sitting right in front of me. Paper egg carton cups! Woot! It worked! 
Clever, huh? :)


Monday, January 18, 2016

DIY Sauerkraut!

It’s nice to see modern research catching up with ancient knowledge. We are re-learning that fermenting food is the best way to maintain proper gut bacteria populations, and therefore keep our immune systems functioning at optimum levels. One of the best sources of beneficial bacteria is also the easiest to make- good old fashioned sauerkraut!  You can make it one head at a time, in one quart jar, or make it by the bucketful using a pile of cabbages. If you use a few purple cabbages in your mix, your kraut will turn bright magenta when it’s ready to eat! 


1. Chop Cabbage. Start by removing wrapper leaves, browned edges, and blemishes. Give it a good rinse. Then quarter it so you have a wedge of stem in each slice. Slice out the wedge from each quarter. Chop cabbage into fine shreds with a good chef's knife, or run through a food processor. Toss shreds into a big wide bowl.  

2. Add Salt. 1 tablespoon to 1 average cabbage. For a bigger head, add another teaspoon, or for a jumbo head, another tablespoon. Do not use salt with iodine or anti-caking agent as it will hinder bacterial growth. I use natural salts which are full of trace minerals.

 3. Mix. With clean hands, dig, toss, mix, and distribute the salt all through the cabbage. After you get it all tossed and mixed, let the kraut sit for a few minutes so the salt begins to pull the water from the cabbage. Tip- Do not disinfect your hands or use soap with lotions or perfumes. You don't want that stuff in your food! Just use simple soap and water.

 4. Pack. Start stuffing kraut into clean jars or buckets. They can be sterilized, but they don't have to be. I find the kraut is better if the containers are not sterile. Keep stuffing. I use wide mouth jars and use my knuckles to keep pushing the kraut down. You keep stuffing until the juice and kraut are both about two inches from the top of the jar. (prevents overflow) Place a glass weight or clean flat quartz stone on top to keep kraut under liquid. For buckets, find a sturdy plate that fits snugly inside the bucket, place on top of kraut and press down firmly until plate is covered in liquid.

 5. Adjustments. What you want is very tightly packed kraut that is completely below the surface of the juice that has been extracted from it. If you need more liquid, mix 3/4 teaspoon salt per cup of water and add as needed.

 6. Monitor. Cover containers and monitor for 3 or 4 days at around 67°F. Anything above 68° can start growing yeast, and anything below 65° slows fermentation. I highly recommend airlock lids for fermenting in jars, but I do just fine using canning lid flats. Just set a flat on top of each jar. Do not leave a tight lid on a jar for an extended period or the pressure of developing gasses will break your jar! Several times daily, remove the flat and pack the kraut down releasing bubbles. Then replace the flat. I would do the same if using fermenting lids. For buckets, press down on the plate and remove any bits of cabbage on top. Cover loosely with bucket lid. Do not ignore your ferment! Bubbles expand your liquid and containers nearly full can overflow when you are not looking!

7. Taste! After about three days, taste your kraut. If it's rich and sweet, you're done! Store in the fridge or cool cellar between 35° and 55°.  As long as your ferment is alive, do not seal your jars! If you use the plastic lids screwed on loosely, that works. Remember to check occasionally to make sure the kraut stays below the juice. Sauerkraut will keep like this for 3 or 4 months. Maybe as long as six months under perfect conditions.